Expo and react-native have now been around for a while. But there hasn't really been an easy way to add react-native modules to expo without actually ejecting out of it. For those who always preferred the managed workflow with Expo taking care of all the native stuff, this has proved to be a tradeoff coz as soon as you're ejected out of Expo, you now get into a situation where you have to manage all of the native stuff on your own. Even adding a simple react native module might involve linking it to the IOS and Android projects and then making changes in the native code so that the module could finally work on both platforms.
But things seem to have changed now as with the recent updates introduced by Expo, it has now become fairly possible to add react-native as well as other native modules to your Expo projects without ever having the need to eject. By using Expo dev-client and EAS(Expo App Services) we can again just focus on the JS side of things and let Expo manage the rest.
How to install react-native modules in Expo?
Let's understand how we can add or install native modules with Expo without ejecting. To install native modules with Expo all you will need is the expo-dev-client. You might already be familiar with the Expo Go app where we scan the QR code to run and test a local expo project directly on our phones. Expo Go is a standard client app that already contains a preset collection of modules that are needed to interact with the native functionalities of your device as well as communicate with the locally served version of your expo project. Now, if we wanna add more native functionalities we can't just add it to Expo Go, instead, we'll need to build a custom client app of our own(similar to Expo Go) with the help of expo-dev-client that would contain all the native features and functionalities that we want to add. Then we can go ahead and install this on our phones and run our local expo project just as we used to with Expo Go. The only difference here would be that our custom client application would contain the native features and modules that we have decided to add instead of those predefined ones.
Now let’s create our custom client app
Since now we understand the process of installing react-native modules to an Expo project, let's quickly get our hands dirty and see how we can build the client app and run it on our IOS/Android devices. We can then use this to develop just as we would use Expo Go. We'll be using a module called react-native-wifi-reborn but you can definitely go ahead and use any module of your preference as the steps described here will be almost similar for other modules as well with an obvious exception where we import and write the business logic to test the functionality of the module. Also, we'll just be focusing on building a debug build of our app that we could test and run as quickly as possible without worrying about publishing it to Play/App stores or Apple's Testflight as it can be a little out of the scope for this blog to discuss those things 🙂
Prepping up
First things first, you'll need to have an Expo project. Consider going through this guide if you need help setting and installing an Expo project.
Install the expo-dev-client package using:
npm i expo-dev-client
Installing the module
Now, let's install some react native module to this project. We are using react-native-wifi-reborn here which is a great package if you wanna play around wifi networks and stuff. Again, you can just install any native module of your choice here and can still follow along. To install the module run:
npm i react-native-wifi-rebornImport the package in your project
import WifiManager from 'react-native-wifi-reborn'So to test the functionality of this module. Lets define a simple function that would connect the device to a wifi network on press of a button:
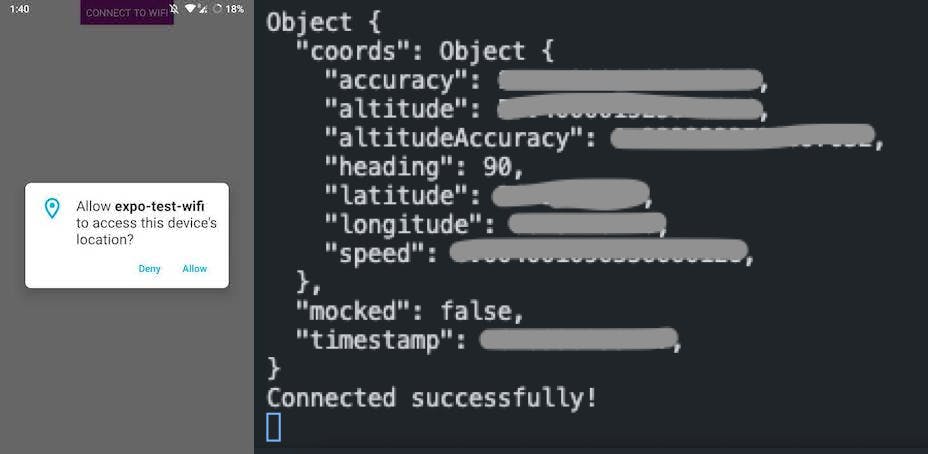
connectWifi = () => { WifiManager.connectToProtectedSSID('mywifi', '87654321', false).then( () => { console.log('Connected successfully!') }, (err) => { console.log('Connection failed!') console.error(err) } ) }<Button onPress={connectWifi} title='Connect to Wifi' color='#841584' />We'll also need to add location permission as it is required by the wifi-reborn module we just installed. This is an optional step, we can either request for permission in code as shown below or could manually give it from our device's settings. Please refer to this documentation to learn more about permissions in Expo.
expo install expo-location
import * as Location from 'expo-location'

useEffect(() => {
    (async () => {
      const { status } = await Location.requestForegroundPermissionsAsync();
      if (status !== 'granted') {
        console.log('Permission to access location was denied');
        return;
      }
      const location = await Location.getCurrentPositionAsync({});
      console.log('Location permission granted', location);
    })();
  }, []);
Configuring EAS
Let's now install the EAS command line interface. You'll also need to have an account with Expo as you might be prompted to sign-in during further steps.
npm install -g eas-cliBefore we could generate a build we'll have to configure EAS first. Run the below command to configure EAS which would generate a config file called
eas.json. Now, during this, you'll be asked multiple questions and will be presented with different options based on how you want to configure EAS to build your app. At this point, we're only concerned about having a debug build of our app. So we'll have to select relevant options and should configure EAS in a way thateas.jsonfile hasdevelopmentClientset totrueanddistributionset tointernal. This would make sure we get a debug build that can be run instantly on any of the Android/IOS devices.eas build:configureHere is how an
eas.jsonfile might look if everything is set up accordingly:{ "build": { "release": {}, "development": { "developmentClient": true, "distribution": "internal" } } }
Building the client app
If you're building for IOS you'll need to register your IOS device first. Run the below command and follow the on-screen instructions to register your device. Skip ahead if you're building for Android.
eas device:createNow, just run either of the below command for IOS or Android to start your build in the cloud. And that's as easy as it can get to build the entire app without even touching a single piece of native code at all ✌️. You'll then be given a URL(or login to expo.dev) to check the status of your build and download the app to your IOS/Android devices whenever ready.
eas build --profile development --platform ioseas build --profile development --platform androidFinally, run the below command to start the development server and then scan the generated QR code from the custom client app(just as we would from the Expo Go app) that we downloaded and installed in the above steps.
expo start --dev-clientWe can test the react-native module we installed by pressing the button and checking if it connects to the wifi SSID provided.

- Perfect! From here on now we can pretty much make any JS code changes in the project and it would reflect in the app 😇
Conclusion
And that's pretty much it. That's all we will need to know to add or install any native modules to an Expo project without even ejecting out of it and I think folks at Expo have done a really great job in simplifying and uncomplicating this whole process. Before wrapping this up, I wanna share some useful resources that helped me in compiling this blog post, might be helpful to check them out.
In case you had a good time reading this post or it helped you in some way or the other, would love to hear from you. I can always be found doom scrolling on Twitter @chiragsrvstv. And if you're feeling a bit more generous, you can consider supporting and buying me cup of coffee. Peace ✌️


